Mission Accomplished

Palm side

Back of hand side
Let me know what you think by leaving a comment below!

Thanks for reading. :-)

Blocking: Not Just for Football and Facebook

Now that I've finished all the knitting my gloves, it's time to block them. Blocking is a process that through the use of water and/or heat, the fibers of the yarn are relaxed and mooshed into the shape that you want them to be. Blocking is also especially great for colorwork because it can help even out any issues you had with your tension while you were knitting. Tension is how tightly you hold your yarn and knit. Variable tension in colorwork leads to lumpy sweaters and mittens!

You may have noticed in some of the earlier pictures of my mittens that the top cuff of the mittens curls downwards. I think this is a problem, but fortunately it is one that blocking can solve.

I prefer to wet block my work. It is tedious and slow, but I am afraid of burning myself on my iron trying to steam block my mittens. Wet blocking also gives you PLENTY of time to make adjustments. In wet blocking, you get your item damp (I spritz mine with a spray bottle) and then pin it how you want it to be. Then you let it dry. Depending on the fiber, the amount of water, the pattern, the temperature in the room, and other things, this can take a very long time. Fortunately, for my gloves, it only took a few hours.

Blocking the mittens
For you knitters out there, if you're interested in making your own blocking board, check out how I made mine by clicking this link (it will take you to an old blog of mine). They are heavy because I used 2'x2' sheets of drywall, but they significantly speed up the drying process. You could also use those lightweight puzzle shaped foam mats, but I don't like them as much.

So Close!

I've finished the body of the second mitten! Now I just need to make the thumbs, weave in the ends and block them!

Amsterdam City Crest
 The crown on the top of the Amsterdam city crest represents the Hapsburg crown. The XXX shield -- though appropriate given the thriving sex industry in Amsterdam -- are actually Saint Andrew's crosses and probably come from the crest of a noble family.

Windmill
I am so please with how the windmill turned out. I think it is just so darn cute! And utilitarian, of course. Even though the majority of the windmills that I saw were the modern ones (imagine a pinwheel that you'd make with a pencil and folding three triangles of paper and pinning them together), I thought the traditional windmill represented a lot of the traditional culture of the Netherlands. Wind power!

The Thing about Thumbs

The thing about thumbs is that they stick out.

What this means for mitten construction is that you need to allow some extra room for the thumb and plan ahead for a thumb socket. Since your thumb is so much lower on your hand than the rest of your fingers, the hole for your thumb has to be correspondingly earlier in the mitten.

A thumb and its gusset
To make sure my thumbs are happy in these mittens, I made a gusset -- essentially a planned, triangular addition to a sewn or knitted garment. Every other row starting at the base of my thumb, I increased two stitches until I had increased 16 stitches. The row after this increase, I removed those stitches and placed them on extra yarn to just hold them until I was ready to attach the thumb tube.

Thumb gusset stitches on waste yarn
When I've finished both mittens, I'll come back with the midnight yarn and put those stitches back on the needle and knit those. I'll also pick up some additional stitches along the inside of the thumb hole to make sure that there isn't a gap in my mitten.

Without a gusset, the thumb won't be able to move as freely, though it does require some additional planning to successfully incorporate it into the mitten. A mitten without a gusset is basically a tube with a small hole in the side for the thumb to stick out.

Rounding the Corner

I've finished the first mitten! I'll still need to add the thumb and weave in the ends, but I do that at the end once I've finished both mittens. I'm pretty pleased with how this first one turned out.

Right hand mitten showing canal houses
I chose to depict the canal houses because they are one of the things that stood out the most to me in Amsterdam and Rotterdam. The homes are tall and narrow to accomodate the limited space -- the majority of Amsterdam is on reclaimed land -- and also to reduce the homeowner's taxes! Rather than being taxed on square footage, Amsterdam homes are taxed based on the width of the building. Each one is a little bit different too, but they all feature very steep staircases.

My mom came out for the first week of my trip before my cohort arrived!

 On the palm side, I thought a bicycle would be appropriate.

Right hand mitten showing a bicycle
I spent more time on a bicycle in Amsterdam than I think I have during the rest of my life combined. I rode all over the city -- we even stayed at a hotel called The Bicycle -- and rode out of the city along the Amstel for an evening in Oudekirk.

What do you think so far? :-)

Stranded!

The type of colorwork that I'm doing is called "stranded" or Fair Isle colorwork. This is a traditional northern European way of integrating multiple colors into a knitted object that has the added bonus of providing extra warmth.

While the front side of the knitted object looks smooth and shows off a pretty colorful design, the wrong side looks like this.

The wrong side of stranded colorwork
You've probably got a pretty good idea of why this style is sometimes called stranded. The horizontal stripes of yarn that you see here are called "floats" because it is like the yarn is floating along the back of the project. It isn't tied or twisted into anything, except for every few stitches, the color that isn't showing on the front gets looped around the yarn that is currently in use. This creates a double layer of yarn for extra warmth and allows you to carry the yarn you're not using all the way around the project.

I chose to use stranded colorwork because items knit in the round lend themselves naturally to this style. It is easy to continue floating the yarn around the glove as you continue knitting. Also, because of the way I designed the tiles, blue and white alternate frequently so having both colors of yarn at the ready is a plus.

Since this is a project about the Netherlands, we can't forget about utility either! The extra heat stranded colorwork provides is especially appealing.

Making Progress

I'm about halfway through the first glove! These are knitting up pretty quickly and I love the depth of color that the yarn has.


Getting Down to Business

Sorry if this post is a little messy... these are mostly the construction notes that I was working with while planning the actual creation of the mittens.

My original plan was to have four tiles on each mitten, but as I began working out my gauge and my designs, I realized that this wasn't going to work. I adjusted my plan so that the functionality of the mittens remained intact and ended up with just two tiles on each mitten.

My original plans from my notebook in Rotterdam
My gauge is 7 stitches by 9 rows for an inch. For me, this means I'm using size US 3 needles which is just great. The smaller stitches combined with the yarn with the high silk content create a nice stitch definition without seeming bulky or too fussy. :-)

From my notebook in Rotterdam
For this gauge, each tile needs to be 22 stitches and 27 rows. There will be two rows of blue on the top and bottom of the tile between the ribbing to make the tile stand out and also provide a solid foundation for the colorwork.

My original framework for the mittens. I didn't end up using exactly what is shown here, but this was the general idea.
I don't want the thumb gusset to end above the tile, so for 16 stitches to be added every other row, the thumb gusset can't start later than row 20. ** Have gusset start at row 19 **

CO 51

Meditation

Lots of folks think that knitting is really hard or frustrating, but I find knitting and most of the things that go with it to be pretty relaxing or even meditative.

In my last post I had two pictures of the yarn that I got from I Knit. The first picture is the yarn unwound in a twisted skein and the second picture is the yarn wound into a cake. The process of getting the yarn from skein to cake is typically pretty enjoyable for me.

I use a tool called a swift to support and spin the yarn.

My swift holding up Fyberspates Scrumptious 4ply in Midnight
To get the yarn into cake shape, I use a second tool called a winder that, as the name implies, winds the yarn up as I crank a small handle. The rhythm and natural sound the wooden swift makes is very relaxing.


Sometimes you run into a snag where the producer has gently tied a knot to help keep the yarn from getting tangled. It's an easy fix, but looks a little silly when you're trying to film a swift in action!


Scrumptious!

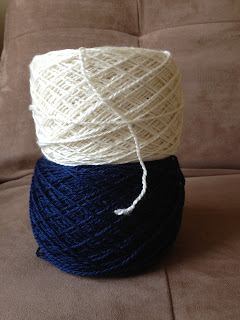
Fyberspates Scrumptious 4ply in Midnight and Natural
This is the yarn that I got at I Knit in London for the Delftwear mittens! I love the shine that this yarn has; it reminds me of the glaze on Delftware pottery.

The shine comes from the silk that makes up almost half of this yarn. That means that it doesn't have a lot of stretch, but for the colorwork on fingerless mittens I'm okay with that. These gloves will probably just end up on the boxier side.

All wound up and ready to go!
Fyberspates Scrumptious 4ply
Fingering weight
399 yards
100 grams
55% merino
45% silk

A Quick Side Trip

Let me tell you a story -- a yarn, if you will -- of a London excursion!

On the Thames by the London Eye

After exploring Amsterdam and Rotterdam for some local yarn, I discovered something quite dramatic about the Netherlands.

They don't have any sheep! (Evidence below)


See? No sheep!

Okay, that's not true; we saw plenty of sheep as we were train riding all over the country. There were even sheep just 10 minutes out of Amsterdam by bicycle. What the Netherlands does not have are local yarn brands. The expense to maintain and distribute yarn from the Netherlands is great enough that those companies weren't able to compete with larger European yarn manufacturers. I suspect that there are individual spinners and dyers, but I didn't come across any of their products.

Naturally, this lack of local yarn necessitated a trip to London (that and the prospect of spending a weekend with my friend, Kristen, checking out the sites -- and a very spooky Jack the Ripper tour -- was pretty appealing).

Kristen on the London Eye with Big Ben in the background
On this weekend trip, we saw Sweeney Todd on the West End, had tea at Harrod's, rode the London Eye, and were flirted with by men who, as it turns out, are particularly fond of librarians.

We also made a quick stop at Hogsmeade to try some butter beer, but our camera didn't work on the other side of the gate.

At Platform 9 3/4
 In addition to Big Ben and this fabulous clothing store called Hobb's, London is also home to I Knit, a yarn store and club. This is the only yarn store that I've ever heard of that is also licensed to serve alcohol, suggesting that this is THE place to knit during happy hour. :-)

I Knit London
I found some local yarn and even picked up some yarn spun and dyed by folks who work in the store! Very cool :-)

I also picked up the yarn for my reflection project... Fyberspates Scrumptius 4ply!

Starting to Plan the Project

I've decided that I'm going to knit a pair of Deltware inspired fingerless mittens for my reflection project for LIS 570. I've always liked Delftware and after visiting the Netherlands, I really liked how much the Dutch seem to embrace their culture and heritage -- even integrating it into their current, daily lives.

What I would like to do is create a pair of stranded colorwork fingerless mittens and a small website to go along with them (ta-da!). I'd also like to write-up my pattern and make the charts for color work available so if anyone else feels inspired by my project, they can make their own.

The reflection project is due by 11:59pm on Monday, October 15, 2012. Between now and then, I need to...

  • Decide on basic shape and structure of mittens
  • Establish guage
  • Create colorwork charts based on Netherlands-inspired things
  • Knit mittens
  • Block mittens to relax tension in colorwork
  • Create website
  • Take photos
  • Share website!
Go go gadget: knitting!